BugByte - Vertical Slice Demo v1.3
Devlog 3 - The Alpha
DUE DATE: June 30, 2023
Now comes work on what I'll call the "Alpha". I'm being pretty loosey-goosey with the wording but essentially it's just a way for me to put labels on big project milestones so I can keep track of my progress better.
The Alpha
My goal for the alpha is, within a month, to have all core functionality in place and working – bugs permitting, of course. Maybe some art assets thrown in here and there to help get a feel for the game. But essentially, all core functionality means that as a player, I should:
- Be able to start a run.
- Explore a random dungeon and catch creatures for my party.
- Fight enemy creatures with my creatures, gain new moves, gain EXP, and be able to die
At this point I’m also hoping to have any design / concept art needed finished up and ready for spriting.
Oh yeah, I forgot to mention – this game has a pixel art style! I decided on a 32x32 asset resolution because I feel like it’s the perfect middle ground to include detail while still not having to draw all the detail. Plus, it gives me room to express the personalities and characteristics of the cute Bytes I have planned! The game is currently actually running internally at 640 x 360 pixels, and what’s happening is that the game is first drawn that way (really small, since all of our monitors are 1920x1080 or whatever), and then scaled up to whatever your screen resolution is, to really push that pixel art feel.
Again, I did jump the gun and put in a ton more work than I should have before recording my progress, so I will try my best to recount in order. In a strange way, it has been really addicting to work on this game, so I end up losing track of time and then suddenly 5 new things are implemented...
2D Lighting
First, I wanted to tinker around with and experiment with some 2D lighting, since I've heard the Universal Render Pipeline (URP) for Unity makes this incredibly easy and fun... That turned out to only be half true.
It took me a bit of time to wrap my head around Unity materials and how the rendering engine reads them. After installing URP I tried to throw in a 2D light but nothing was happening. I then realized hours later that the SpriteRenderer components of the objects already in my scene were not updated to use the new Sprite-Lit-Default material. Once I had that in, sprites were being lit!

If you have sharp eyes you might have noticed the sort of 3D effect happening on the tiles in the above gif. First of all, good eye! Second, that is something I was messing around with called Normal Maps.
Normal Maps
For my last year in my undergraduate degree I took a computer graphics course. I didn't realize until after but I fell in love with it, so I wanted to try and incorporate something related to it in the game. This brings us to normal maps.
I'll try to explain. The illusion of depth, to our eyes, is created by what rays of light hit our eyes and at what specific positions in our eye. Now, assume we're looking at a flat table in a 3D space, like your living room, from the side, as we try to observe one such light ray from, say, a table lamp. When light hits a flat surface, it uses the normal of that surface (a vector pointing in the direction "up" is for that surface) to figure out which way the light should be reflected. Kind of like this: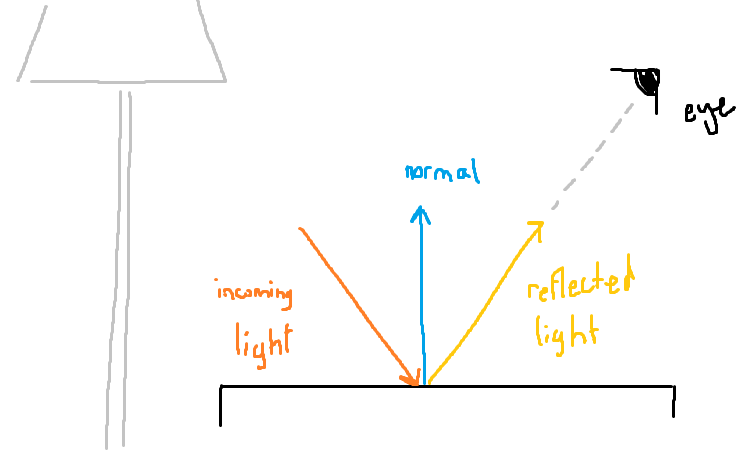
The angles themselves aren't really important for us, but the concept. If whichever way "up" is determines which way the light bounces, then maybe, if we can mess with that "up", we can modify the way light bounces without actually doing anything complex.
Say our table has a small triangular indent, for whatever reason. Let's look at what the normal vectors of the table look like now:
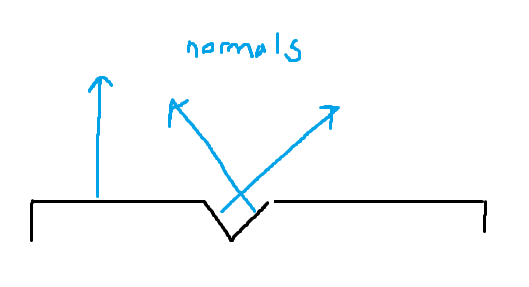
That means if light hits those parts of the table, they'll bounce in different directions than if it were to hit the directly upwards facing flat surface. This is the essence of how normal maps work, and how Unity also calculates lighting with the URP 2D lighting system.
Instead of a table, imagine its a texture for a game object, or a tilemap, in this case. If we can tell Unity that different parts of our tilemap texture have different "ups" or normal vectors, then Unity will have the light reflect that. To that end, we use this - a normal map!

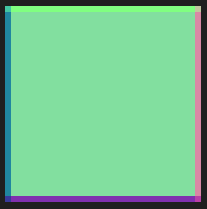
On the left is what the tile normally looks like, and on the right you might notice the colors are slightly funkier, but they kind of resemble the tile. That's because within the sprite on the right, we're actually encoding information as to which way is "up" for each pixel of the tile. A vector has 3 components: x, y, z. What else has 3 components? Color! Colors have r, g, b. So, what we're actually doing is using the color of the image to mean x, y, z values!
So green in the image on the right translates to RGB(0, 1, 0), which then translates into XYZ(0, 1, 0) - in other words, directly up!
Here's a more obvious example:

And that's the basis of how 3D-looking lighting is achieved in virtually any digitally-rendered medium! Kind of tangential to the game itself, but I think it was cool enough to warrant an explanation.
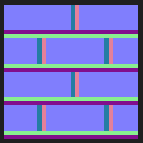
ShadowCasters
Another nifty quick thing I added when it comes to lighting were these ShadowCaster collision boxes. These basically act as walls for the URP lighting system, so that you can create some really cool shadows!
You'd typically have to either create the ShadowCasters yourself or write a script to do it for you. I chose the third option, and that was to use a free-to-use version I found on the Unity forms! Many thanks to the creator, I will come back one day and write an extension like this myself :)
Inventory and EXP
I wanted to have creatures be able to earn EXP on kills, and also for the player to have their own inventory! The inventory was really simple, just a single script that maintains a list, so no reason to dive into that one. However, I should mention that I approached item objects in a way that was essentially identical to the way I approached creatures and attacks - scriptable objects, wrapper classes, and self-contained logic. I made a simple potion that heals 5 health, and a "Capture net", which is an item that you place on the ground - enemies that touch the capture net at any point are captured and added to your party! This was all done with box colliders, tinkering with actions some more so there aren't any dangling coroutines that result from enemies being deleted mid-action, and writing a single script to handle the collision detection.
Now, onto EXP. I thought to make use of my Event system I implemented from last time. I'm sure I could do this better, with hindsight in mind, but I thought it would be the easier route for now. It kinda was. What I ended up with was to give each Byte a unique integer ID. So 0, 1, 2, etc. Then, whenever one Byte damages another, the one that was damaged retains a list of which IDs hit it. When it dies, a script listens for an "OnByteDied" event, which sends information about which Byte died. Then, it finds the Bytes with those IDs and pays out the EXP to them. This way, you can have multiple party members take part in a kill, and they'll both reap the rewards! Neat!
Improved Attacks & Animation
One core kind of attack I wanted to incorporate were melee attacks! Attacks that'll lunge the attacker forward and create some kind of hitbox in a range. I set out to create the foundation, starting with a very simple attack that I call "Scratch".
Scratch
Scratch will be pretty straightforward. When I press the attack button, the following should happen:
- My creature lunges forward;
- They create a hitbox with the attack animation;
- They slide back to their original position.
I was able to achieve this with an Animation timeline and some BoxCollider2D stuff! I know there's plenty of nicer ways to do this, but I figured if I try a bunch of ways I can figure out what works for me and what doesn't. Plus, this helps me get acquainted with Unity's animation systems.
Luckily this way makes it really easy to set up! All we have to do is drag our sprites into the animation window (after making a new animation file, of course) and then they'll play in order! I drew a simple test animation to be able to play with.
We can tweak the animation speed, and also animate any properties of any components attached to whatever the animation is attached to! Including BoxCollider2D. So, what I ended up doing was having my Scratch prefab just play a sound on creation, play through its animation, and turn on the BoxCollider2D for only 1 frame - the frame where the impact of the animation is:
Nice! After writing a quick script to detect overlaps and deal damage thanks to the wonders of Interfaces and Polymorphism (again), this prefab was ready for use.
For the attack, I needed to animate the actor lunging forward, and then retreating back. I thought this was hard at first, but then I remembered I literally created a MoveAction that takes in a start and end point to animate an object between... So I reused it. This also kind of makes the code read really nicely (I think?).
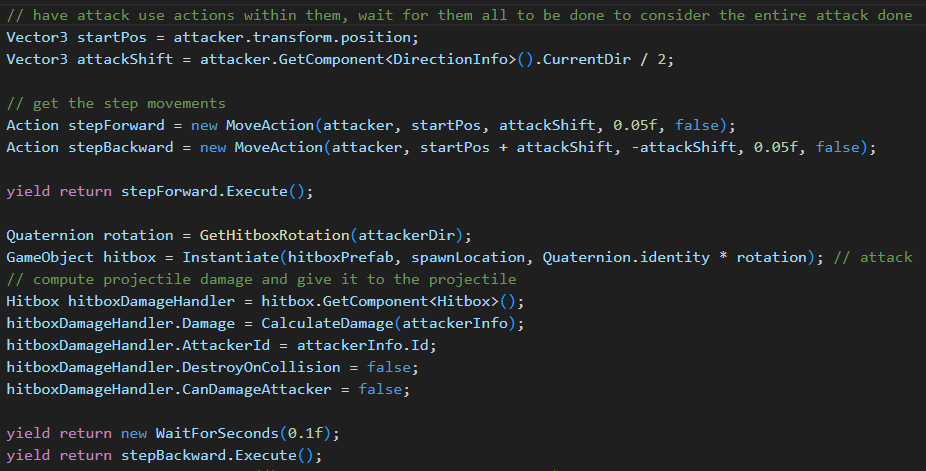
Using a coroutine lets you chain them together nicely in this sequential order with timing and everything, so it works out kind of nicely! I don't love how I did the hitbox code, but it'll do for now.
Now when we put it all together, we get this!
Push
Using similar logic, some more collision checks, and a bit of luck, I also created a really fun "Push" attack that lets you bump things across rooms:
I thought it might be fun to have a move that you can use to take advantage of enemy positioning with. So if you bump 2 creatures into each other they'd take some extra damage! Also, I thought it would make for a fun capturing mechanic - if you bump a creature over a net you place down, then you can add them to your party!
And to top it all off, I was able to get cooldowns and energy costs to work! It was as easy as adding a Cooldown property to my Attack objects and having the AttackAction check those. Easy!
Bomb
For my final challenge, I wanted to create a bomb attack that would interact with the push attack. I think it would be fun to bump a bomb into enemies and time it so it explodes on them! So, the bomb attack would do the following:
- Place a bomb
- After a certain amount of turns pass, Explode in a pattern!
This turned out to be a little more challenging than I thought, since I have the ActionManager set up such that it evaluates every action every turn. Also the AttackAction is hooked up so that it only fires once when it's evaluated, then it gets removed. So I'd have to make a separate action, a BombAction, that lingers in the ActionManager until its timer hits 0...
And that's exactly what I did and how I did it. The BombAttack is actually only in charge of placing the bomb, but then it queues up a BombAction into the buffer queue. Every time the BombAction is evaluted, it ticks a timer down by one, and when its evaluated at 0, it triggers the explosion! Here's a demonstration with the Bomb's timer set to 3:

The explosion is basically just a single prefab that contains a bunch of smaller prefabs that are exactly like the Scratch one from earlier. Nothing crazy.
Plus, you can push the bomb too, thanks to Interfaces! And you can determine if something is bouncy! By bouncy I mean how many tiles they recoil after colliding with an obstacle. Interfaces make everything so easy.
The last thing I wanted to do in this version was to try my hand at making use of courses I thought were never going to come up again in my undergraduate degree. And by that I mean I wanted to try implement a pathfinding algorithm that makes use of graph theory. Enter, A* Pathfinding.
A* Pathfinding
The algorithm itself isn't particular complex or anything, but there are some concepts that you have to wrap your head around first. I will try my best to explain this by distilling both the Wikipedia page and Code Monkey's explanation into a shorter summary, as these are the resources I used to help understand. Please check both of those out if you're interested in diving deeper and if you want to actually implement it yourself!
Firstly, the concept of the Grid. Okay, this one isn't hard to understand, but it's something we'll need to set up to be able to work with, as the algorithm needs to be able reference specific grid squares to do some calculations.
Costs
So, there are 3 values that each grid square, or Node, will contain:
- A Walking Cost (referred to as G)
- A Heuristic Cost (referred to as H)
- A cumulative cost (referred to as F)
So say we want to find a shortest path from a Node A to some Node B.
The G Cost for some node X is fairly straightforward, as it is just supposed to be how much it "costs" to move from A to X. You might be wondering, what is the "cost" supposed to be? Well, we can define it by using some fundamental trigonometry. Let's assume that our grid squares are each 1x1 squares - so each square spans 1 unit. That means, based on the Pythagorean Theorem, that the diagonal line from one corner of the square to the other is of length is √c, where c2 = 12 + 12 = approx. 1.4. So we can use 1 as the cost to move up, down, left, or right, and 1.4 as the cost to move diagonally. But, decimals are technically more computationally expensive to work with, so if we just multiply both costs by 10, then the horizontal cost becomes 10, and the diagonal cost 14. Nice!

The H Cost is essentially just a best guess at how much the cost would be to brute force travel directly to the end point. So this assumes there aren't any unwalkable nodes or any other restrictions.
The F Cost is just the summation of both, and is what we'll use to find our shortest path.
Finding the Path
To find the shortest path, we essentially keep 2 lists of nodes: an Open List, which contains all nodes that we haven't looked at yet, and a Closed List, which contains all nodes that we have looked at already. This is pretty common to have in these pathfinding / graph traversal algorithms, but felt it was worth mentioning.
So all that we do now is first calculate the starting G, H, and F values for each node. Then, put A into our Open List.
Then, for each node in the Open List:
- For each node that neighbors the current node:
- compute a tentative G cost by taking the current node's G cost and estimating the cost to travel to this neighbor.
- if this tentative G cost is less than the one that already exists on this neighbor, replace it and store this node as the node that it came from in the neighbor.
- Put the neighbor in the Closed List
And you repeat this over and over until either your current node is exactly your end node (in this case, A = B), or we've searched every single node in the grid and the aforementioned match never occurred. Once that's all done, you simply check the end node, B, and follow its chain of neighbors back to the start node, A - reverse that list and you have your path!
Now all I have to do is hook it up to align with my rooms and ta-dah!
All I have to do now for multiple rooms is to just have each room instantiate its own grid, and have enemy AI reference that room's grid! With this I can get started on making more interesting AI that doesn't just waltz back and forth. But for that I'll need Behaviour Trees, which I'll touch on next time!
Progress so far
I've managed to put in lots of cool snazzy new things that should hopefully make the game a little more interesting once it all comes together. I didn't manage to hit the original goal of being able to start a run, gain moves, so on and so forth, but I still think progress is going well! We'll see if I need to readjust the scope of my game but I'm still feeling good about it.
Until next time!
-Arda
Leave a comment
Log in with itch.io to leave a comment.