BugByte - Vertical Slice Demo v1.3
Devlog 4 - The Beta
DEADLINE: July 31st, 2023
Quick Reflection
Last time I talked about more core systems and features that need to be in the game to define what I called the "Alpha". Did I reach the goals I originally set out to in the Alpha? Not quite...
My First Mistake
First, I'd just like to say that adding any sort of random generation to something in a short timespan, especially for someone who's still acclimating to the workflow, was an incredibly ambitious and pretty bad idea. One of my goals was to be able to "explore a random dungeon and catch creatures for [my] party". This turned out to be unreachable. I had come up with some very high-level ideas for how I would accomplish random dungeon generation and thought that would be enough of a starting point, but I was so very wrong. My initial idea was to create prefabs of rooms, hand-made by myself, and have an algorithm that would "stitch" them together in a random fashion, kind of like The Binding of Isaac. It turns out this can get messy when you use Grids and Tilemaps, as then you'll have overlapping (and multiple) grids, plus I'd then have to write an algorithm that would come up with the distribution of the rooms - we wouldn't want there to be 5 shops and only 1 enemy combat room, right?
All that to say, with how much core functionality I still had left to do, and how little time I had remaining, I decided to axe that for now and work with a hand-made "demo" level. If I had time at the end (or if I wasn't totally burned out yet) I would come back to it and try my hand.
My Second Mistake
Scope creep. Yup, I knew it was coming, but luckily this wasn't awful in my case.
I'm gradually starting to realize that I packed way too many mechanics into what is effectively my very first self-made game. There's different attacks with different functionalities, different creatures, evolution for those creatures, capturing creatures, random dungeons, EXP, a roguelite hubworld with permanent upgrades, NPCs, a boss, and so much more. I had convinced myself at the beginning of the project that this was way smaller of a scope than everything else I'd done in the program, so it should be fine. Truth be told, it was - it was significantly smaller than other games that I've worked on throughout my time at George Brown College. But, for someone who is just a solo developer, artist, and game designer, I think I still over-scoped the game given the time limit.
To that end, I ended up having to cut down the scope by doing the following:
- Reduce the number of planned creatures from 2 creatures with 2 evolutions and 2 creatures with 1 evolution to just 3 creatures with no evolutions. I had so many great creature ideas but alas, not enough time. Because of this I also reduced the maximum party size from 6 -> 5.
- Scrap the hubworld with permanent upgrades. Originally there'd be a hub you could walk around in, filled with NPCs you'd talk to. One such NPC, the 'Task Manager', would allow you to spend currency that persisted through playthroughs to expand a simple linear tree of permanent unlocks, like "your creatures now start with +2 base health", etc etc. You'd unlock new branches of the tree by capturing new creatures, which would push the player to want to capture more. Of course, as you can tell, this was far too much work. Although I think the game would be significantly more interesting and charming with it, but I had to make the decision...
- Scrap random dungeon generation - for obvious reasons.
- Scrap the boss. I figured if I had time at the end I could come up with one, but we'll see how that goes. For now my fallback plan is to just put a really juiced up enemy at the end with a trickier room and new attacks..
- Reduce the amount of planned attacks available to the player. Because of this, I also reduced the maximum amount of attacks a creature can have from 4 -> 3.
Ok, now let's get started on what I'm calling the "Beta".
The Beta
I won't lie, the beta did not start off strong for me. At this point I was feeling pretty burnt out on programming for the time being, despite there still being lots more that needs to be done to get the game to point that's fun. However, there was still work that needed doing that required the other side of my brain - art! So that's exactly what I did
Drawing Time
I am incredibly indebted to my younger stubborn self who would draw non-stop any chance he got, because it's all thanks to him that I have a decent amount of drawing and animating skill. I used to stay up late on my Windows 98 computer drawing Galacta Knight on MSPaint with a mouse, creating animation after animation that looked just absolutely abysmal in Adobe Flash, and redrawing the same characters in the same pose over and over. And it all culminated to this very moment.
The Environment
I first wanted to get a good sense of what the world might feel and/or look like. I had a rough idea, but I needed a concrete piece of art I could come back to. So, I set out to create concept art for my very first (and only) level - Shifty Shores!
I intended the overall mood for the game to be that sort of goofy early 90s internet era - reminiscent of things like GeoCities, AOL, MSN, those goofy "Desktop Buddies", radical vocabulary, and most importantly, dithering. This was an incredibly common pixel art technique back then, so I thought it fitting to use to help make the connection more obvious. It's also just incredibly nostalgic for me, personally.
I also wanted the first level to be some kind of beach-resort-meets-circuit-board environment - a beach as you know, but with cables, circuitry, and general technological oddities scattered throughout. With all that in mind, I got to work, and scribbled out this linework:
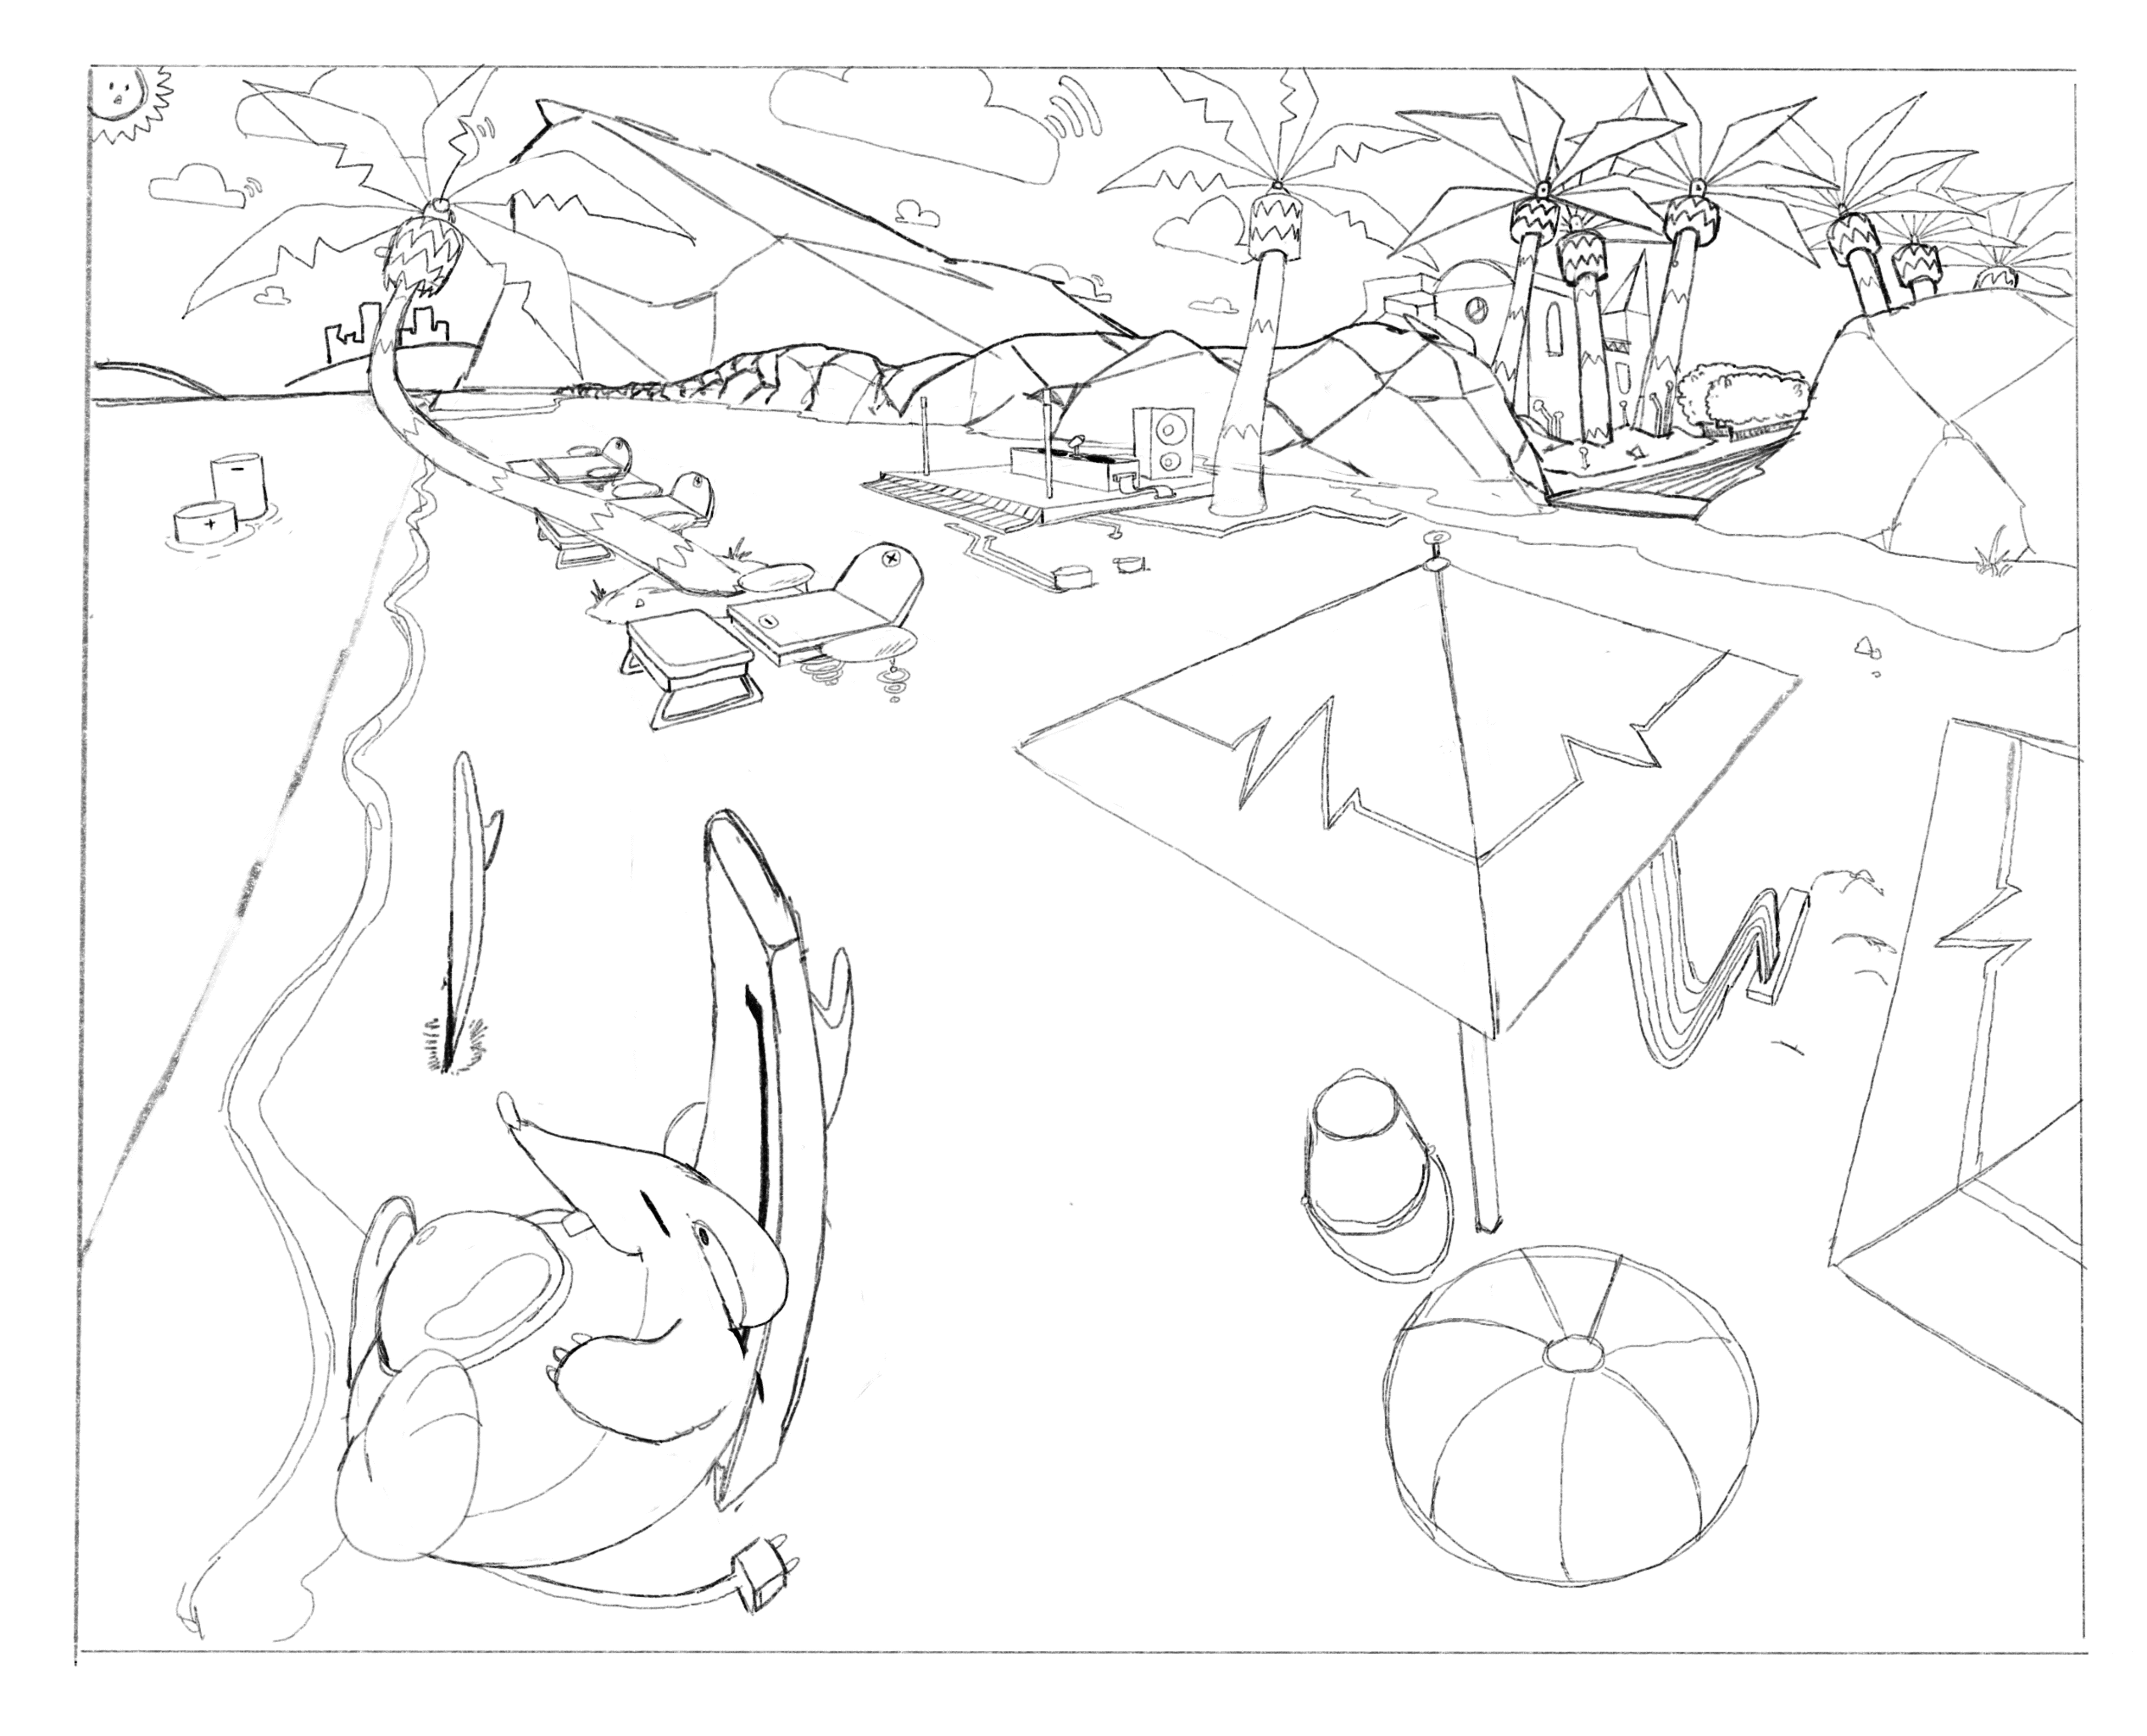
I was pretty dang happy with how this turned out. Granted, it might not be as detailed as I wanted it to be, but I think I captured the atmosphere of what I pictured in my brain. Plus, I got to draw in one of my creature designs hangin' out! I'll get to him in a second.
Coloring would take me a good long while, so in the interest of time, I quickly got to work on spriting the environment tiles to get a good feel for how they would look in-engine.
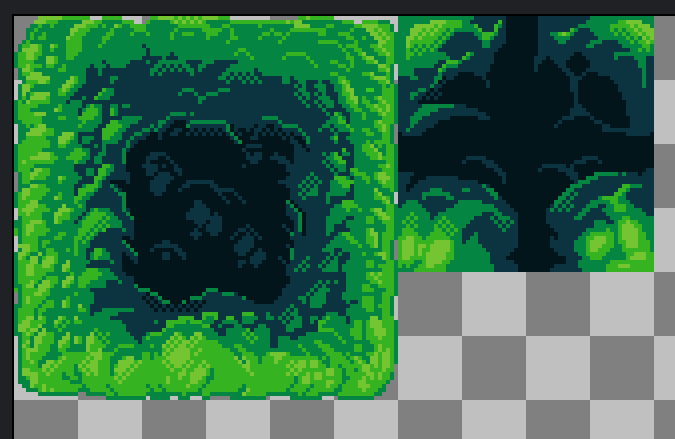
For this I used a piece of software called Aseprite- it's absolutely fantastic and I highly recommend it to people of all skill levels who are interested in doing pixel art! After getting used to it, I attempted my first tile for what I called "beach rock" - basically large rock piles that you'd find by the beach. These would act as one type of wall / obstacle. This was my first attempt:
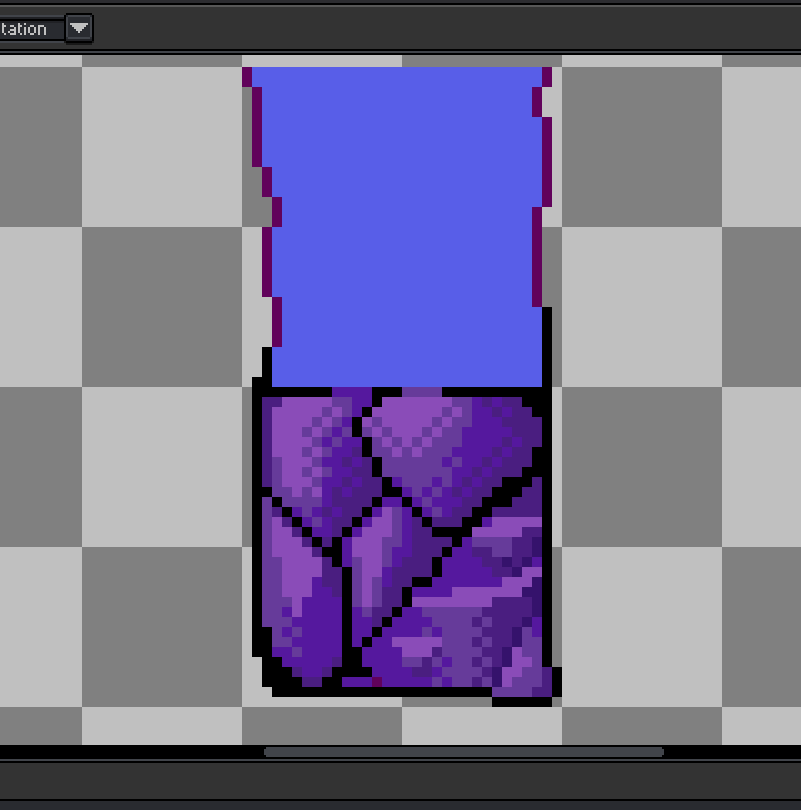
Yuck. The texturing and colors turned out nice but the shape was too flat to reflect any sort of interesting form. This was my second attempt:

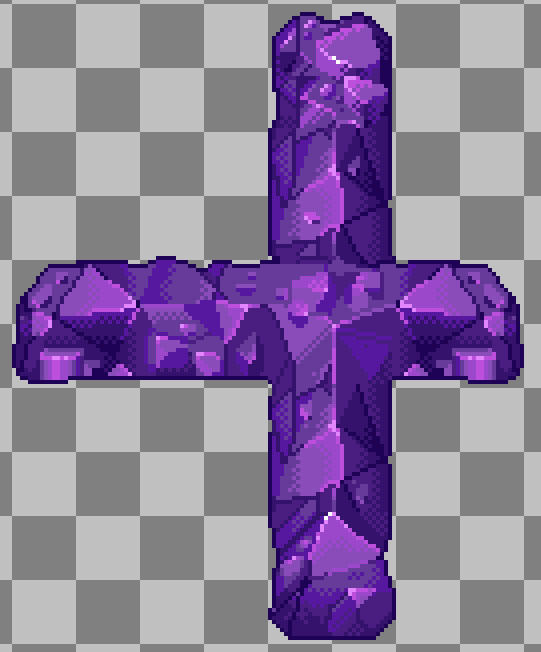
It was getting there, but it's still far from what I wanted. I worked constantly on this for a day or two, and ended up with something I was fairly happy with:
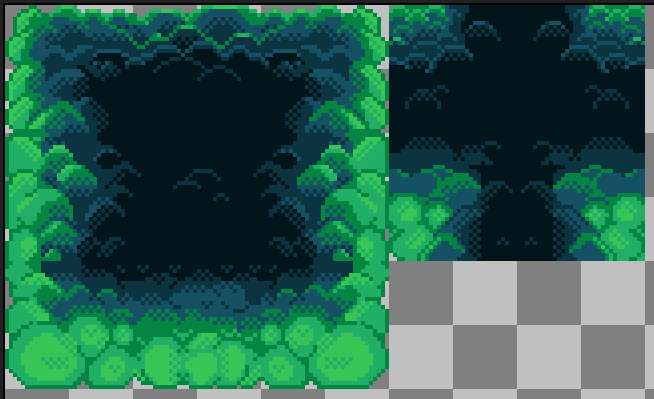
Great, looks awesome - good enough at least to put into the engine. Next up I attempted some grass shrubbery to act as the padding between rooms, and the borders. Similarly, my first attempt wasn't too great:
Wasn't too happy with this either - my friends and classmates all though it was like moss or goop or something. Luckily I was much happier with the second attempt again:
Lastly, all we needed was some flooring, and the obvious choice was sand! I did one attempt and it turned out good enough, but the tiles don't really tessellate all that seamlessly, so I'll come back to it later:
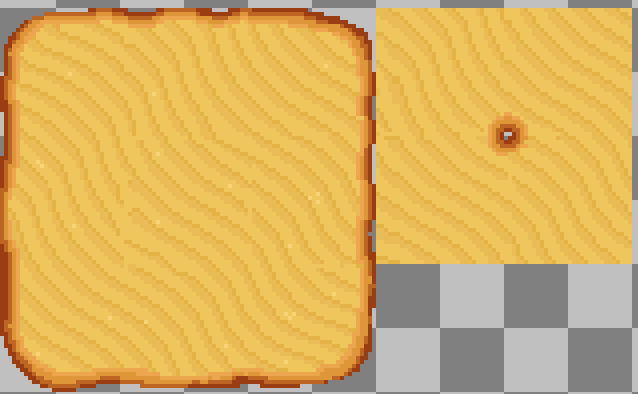
A beach isn't complete without water, either!

The hardest part about these was making sure they all tessellate nicely, but luckily Aseprite has some great tools to make that easy breezy.
Now I needed some cute little guys to populate the world with - Bytes!
The Bytes
These were where I felt like I could have some fun just coming up with goofy cute little creatures. One of the core pillars of the game is attachment and permadeath, which I'm sure just upset a lot of people reading that. I want people to grow attached to their creatures so they do their best to keep them alive!
With that said, I set some guidelines for how I came up with creatures. They:
- Had to have an animal component - pretty straightforward, like limbs, a mouth, eyes, something to make them a creature.
- Had to incorporate some kind of hardware, software concept, something technological into their appearance.
- Had to have a distinct visual identity from the rest.
And here's what I came up with!
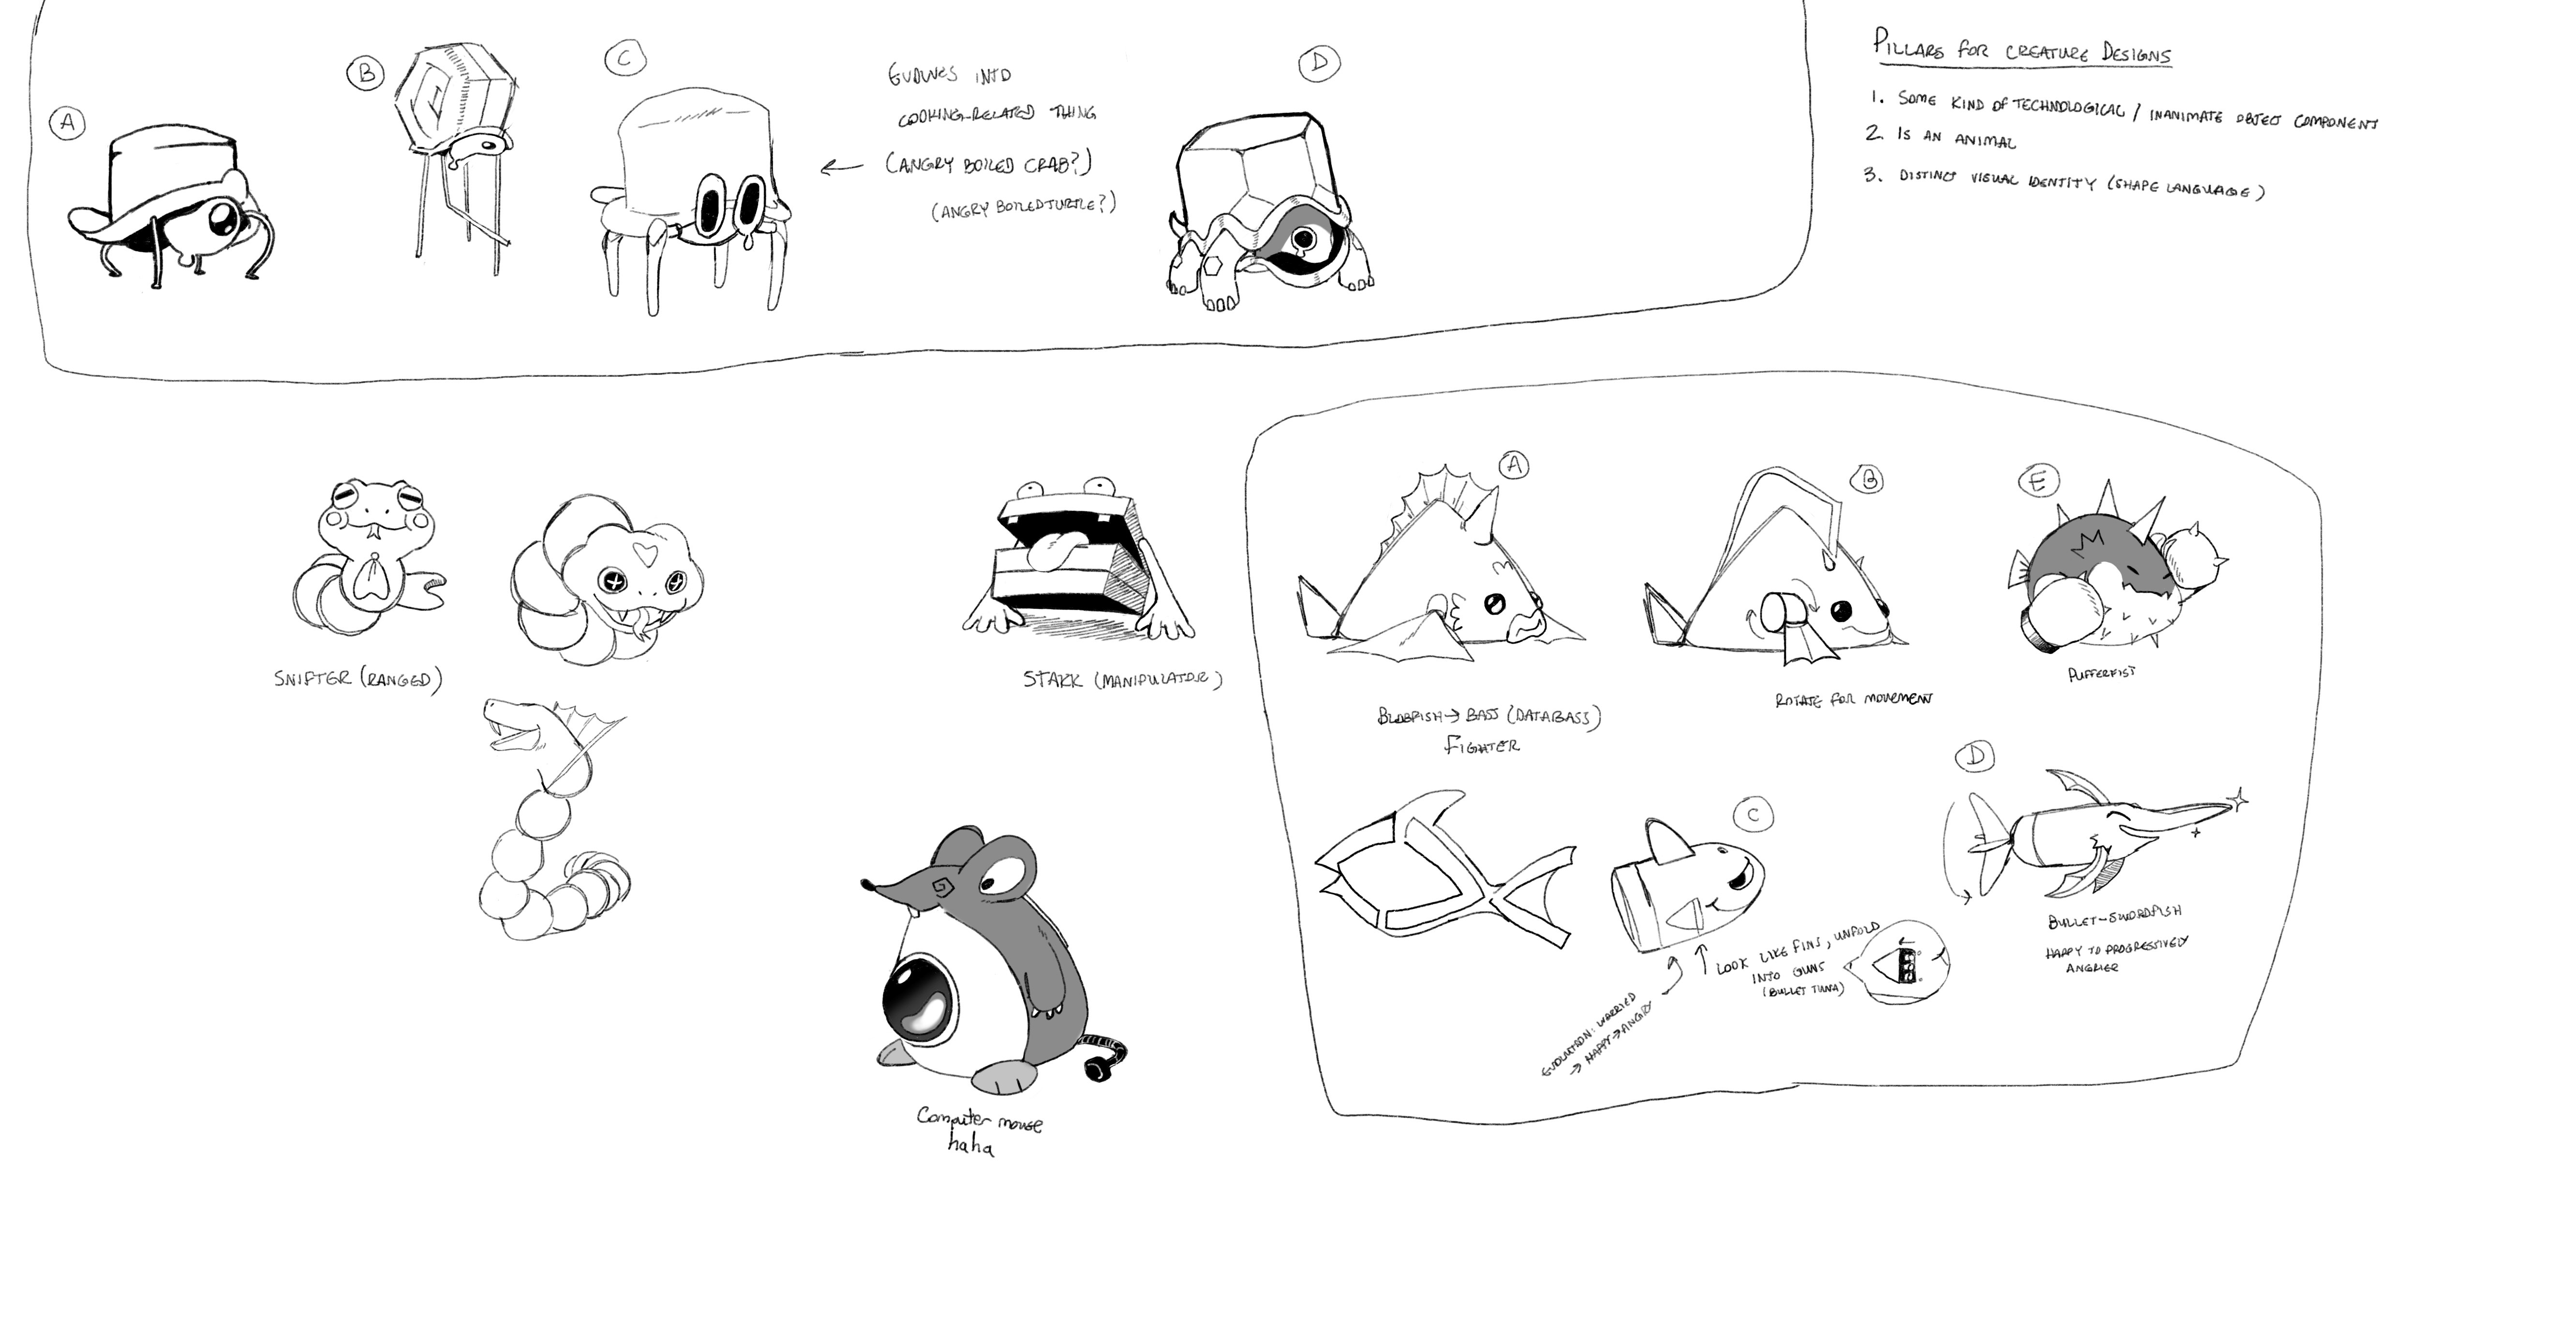
I tried a bunch of ideas, from Transistor turtles/crabs, to a living Stack, to a Bit-Shifter snake. The standouts for me were these five:
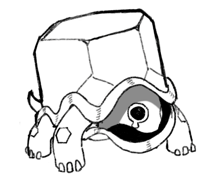


In order they are:
- Transisturt, the transistor turtle
- Snifter, the bit-shifter snake
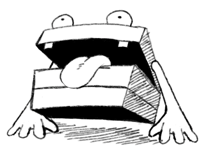
- Stakk, the living Stack
- Slowdent, the old-school computer mouse
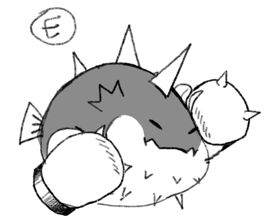
- Pufferfist, the zip bomb
I love these little guys! But because I had to choose 3 to animate and properly put in the game, sadly I had to put 2 on the shelf for now.
So, I got to work, and animated TONS. I ended up animating these three little guys:
Pufferfist


Stakk


Slowdent


I am so happy with how they all turned out. I especially have some incredibly strong favoritism towards Slowdent! I ended up making him closer to the end of the project, actually, but I figured I would put every creature here because I had intended to animate him first but time slipped away.
I also slid in a cute little custom cursor, just to add a bit more charm to the game. I was inspired by both the custom cursor extensions of the era, and also MapleStory's mouse cursor. With both of those in mind, I drew up this:

Last key things that needed animating were attacks. I did end up also doing these near the end of the project, but I think it makes sense to bundle all the art in one post since it didn't really evolve all that much throughout the rest of the development.
Lightning round!


And there we go! That's pretty much all the major unique art I drew / animated for the game, minus the UI elements and some minor tile decorations. Those weren't as interesting to create as these were, so just take for granted that I whipped together some UI windows and buttons really quick in a similar fashion.
Programming Time
After a well-needed art & animation break, I was feeling ready to take on some more programming.
While we're still on the topic of art, one big headache saver I wanted to implement was an animation setup that I saw YouTuber AdamCYounis use in some of his videos - granted, what I ended up with isn't quite exactly what he has, but it's close enough that I felt I should give him credit! I respect him a lot and really enjoy his videos.
He called them FlipSheets and "FlipBooks, which I think are fantastic names that are evocative of exactly what their functionalities are.
FlipBooks & FlipSheets
Creating a new animator and editing their timeline, properties, etc every single time got really tiresome and just did not sit well with me as both a programmer and software engineer. The FlipBook and FlipSheet setup aims to alleviate that a bit by having animations controlled by a simple script (the FlipBook) that you just feed a list of sprites (FlipSheets) to play.
The way it works is simple - a FlipSheet is an object that contains information about a specific single animation - like an idle animation for example. The keys things it contains are a list of sprites for the animation and the framerate of the animation.
Then there's the FlipBook, which is a component you can attach to any GameObject. Then, all you need to do to play an animation is get the FlipBook component and call its Play() method, with a specific FlipSheet as a parameter. You can even declare whether or not the animation should loop over and over - useful for something like a walk animation! Once Play() is called, the Update method for the FlipBook goes on its way and begins to change sprites in the order of the FlipSheet - ta-dah! Animation.
So what I ended up doing to animate my Bytes was create a subclass of FlipSheets that contain an enum for the different types of actions, like Walk, Attack, Idle, etc. Then, I made it so each Byte's ScriptableObject contains these "FlipSheetGroups", which are just a collection of different FlipSheets. This way makes it really easy to play specific creatures' animations anywhere, as long as you have a reference to the template object for that creature.

It's so simple yet so elegant, I love it!
Scaling Curves
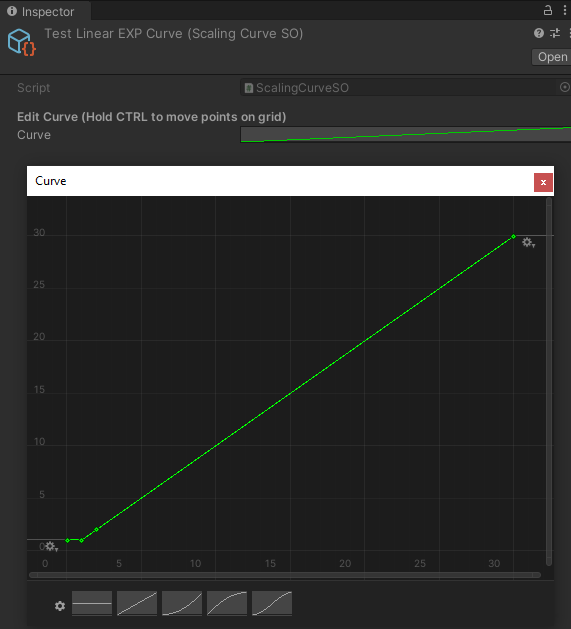
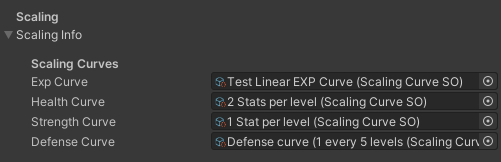
My next task was to come up with a simple designer-friendly way to edit a Byte's stat scalings, because I imagine I'll be doing this a lot by the end after some playtests. So, I came up with a nice simple "ScalingCurve" class! It's very simple - using Unity's built-in AnimationCurve library, I just created a ScriptableObject that contains one of those. Then, I added some simple helper functions for the scaling curves that would be useful for me in calculating stat bonuses for creatures.
One such function is GetValueAtLevel(int level), which, as it says, gets the value of the curve at a specific level (or x-value). Then, there's the function GetSum(int from, int to) which gets the sum of values under the curve from one level to another! This is useful because if a creature is level 5, for example, I want their stats to include the bonuses all the way from level 1 to level 5. So I'd want their Strength, for example, to be equal to their base strength + (lvl 1 strength bonus) + (lvl 2 strength bonus) + ... + (level 5 strength bonus).
Then, that was it! Every Byte ScriptableObject now contains a few of these curves, so you can tune the scaling for each individual stat with its own curve! It's not perfect, but it'll do for now!
(NOTE: This is Arda from the future - this ended up singlehandedly being so incredibly useful in playtesting, I am so thankful I had it.)
Now, one final task that I was dreading - the Enemy AI. Kind of like random generation, I've always heard that AI can be such a nuisance to program and implement yourself, but unlike random generation, this to me actually seemed doable based on my computer science knowledge. So I gave it a shot with Behaviour Trees!
Behaviour Trees
I did say I had enough computer science knowledge to tackle this challenge, but I did need some help to frame the problem in the context of video games and enemy AI. So a very special thank-you to Mina Pêcheux's awesome tutorial on how to implement Behaviour Trees in C# - she does a great job at explaining the theory behind the concept. I'll try to explain my understanding of it here, because to be honest, trying to explain something helps me understand what I don't understand better
How it works
In its essence, Behaviour Trees are just a fancy way to route code flow and have AI follow a sort of decision path. You chain together a bunch of Nodes in a Tree, with each node having either: a Pass/Fail condition, or an action that it performs. I'll try explaining with this diagram of what I want Slowdent's AI to behave like:
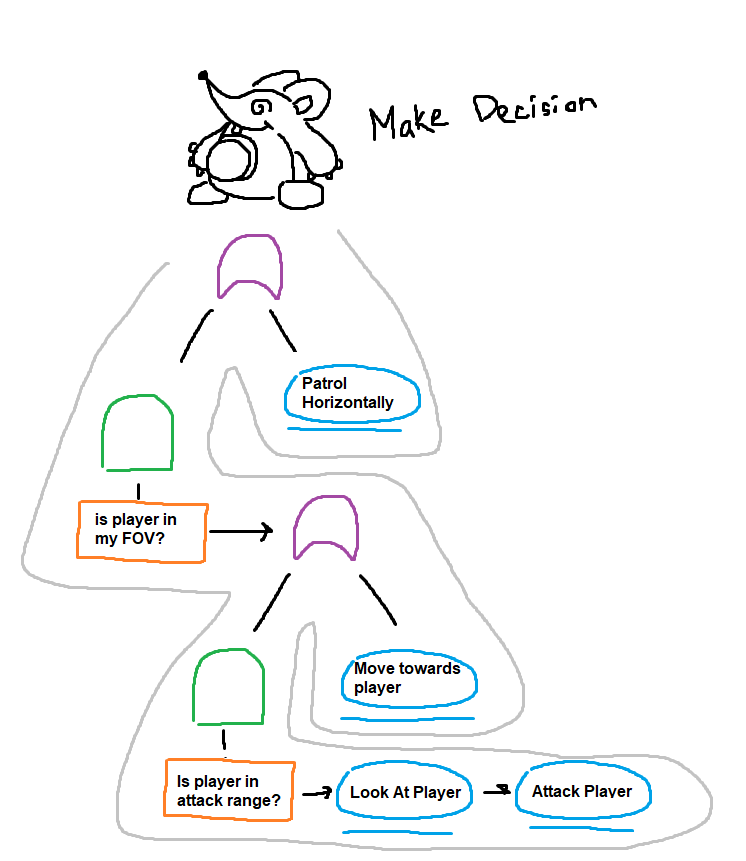
Ok, so let me try to explain. The blue circles are basically the end points of the creature's decision - basically, the result of his decision, what he'll do after, however you wanna word it. Now, the difficult part is trying to get him to come to a single conclusion in a hierarchy. We can do this using Nodes, like I mentioned, but there are different kinds of nodes at play here. Each node has a state (there's a third state for games that aren't turn based, but because I didn't need that for my purposes, there are only 2): Success, or Fail. These will be important.
Most importantly are what Mina calls Selector (purple) and Sequence (green) nodes. These essentially work like your typical logical OR & AND gates, respectively.
A Selector's state will be Success if at least one of its children's states is Success - like an OR gate! If all of its children return False, then the Selector will return False. The only difference is that the Selector runs its children in sequential order, left to right, so you have to be specific in how you build your trees.
A Sequence's state will be Success if every single one of its children's states is Success - like an AND gate! If a single one of its children returns False, then the Sequence returns False. The difference here is, again, that the Sequence must run its children in sequential order. What's cool about this one in particular is it also effectively works as an 'if-else' code block!
The orange nodes are what are referred to as Check nodes. A Check node does exactly what its named after - it checks some kind of condition, and if its true, its state is Success, otherwise, its state is Fail.
Lastly, as I mentioned earlier, the blue nodes are what are referred to as Task nodes. A Task node performs an action - it's the end point of the decision tree. Once we hit a Task node, the decision-making process is over - the mouse has decided what to do on his turn.
So in the diagram above's case, Since the entry node is a Selector, it first runs the left child, so it runs a Sequence, which then asks "is the player in my field of view?". If the player is not, then the Sequence is False and the entire left side of the entry Selector is False. So, the resulting decision bounces back to the Selector, which then runs its other child, "patrol horizontally".
If the player is in the mouse's FOV, another Selector is run: the Selector goes down to the Sequence, which then asks "is the player in my attack range?". If yes, then the 2 tasks "look at player" ;and "attack player" are run in sequential order, and the decision-making is done.
Otherwise, if the player is not in the mouse's attack range, the flow bounces back up to the Selector again, which runs its next child to see if they're successful. In this case, its a task, which is guaranteed to be successful, so it just runs the task "move towards player."
And with that, we have a fully-fledged AI with complex behaviour trees! it's nothing crazy, but I think it's just fun to play around with the concepts and actually implement them and see them working!
Here's what that looks like in code form, if you were curious!
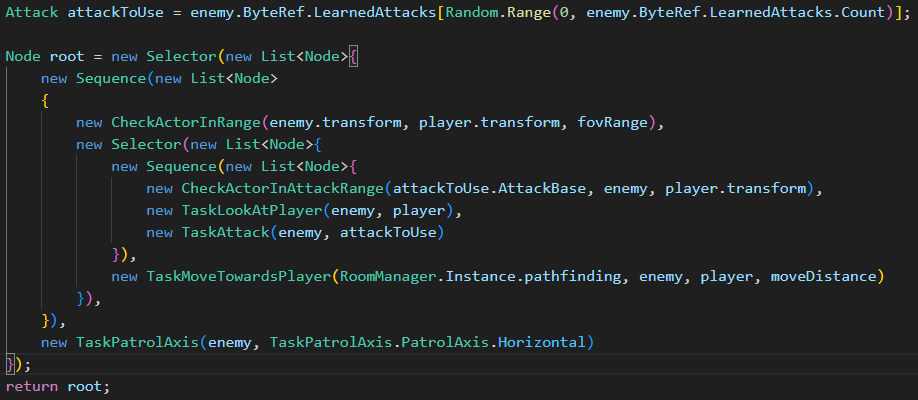
Super easy to set up! The mouse enemy will basically evaluate this tree every time the player ends their "turn" (i.e. finishing a move or attack action).
Now let's check it out in action:
Oh yeah, I also put in some info whenever you hover over enemies! It shows their name, level, current RAM (the mana system), current HP, and their turn order! And, most relevant for this section, their FOV and attack range! This way it should be fairly obvious to the player where the danger zones are and that the different colors mean different actions. The blue is both the enemy's FOV as well as their movement range - in this case, this mouse enemy has a move distance of 2. If I continued the game further, different creatures would have different move speeds, meaning the number of actions they could take in their turn before it ends. But yeah, again, time is ticking so I had to put it on my wishlist.
Also, damage numbers! Nothing crazy with those, just some instantiated prefabs with a little bit of static functions to create them from anywhere in the code. I ended up making more versions of these pop up numbers for things like feedback messages and stuff like that.
UI and Feedback
I then ventured to make some things in the game much clearer to the player. It's no fun to be playing something and to constantly be like "wait so how do I do this? why did that happen? why did my guy die??" Not to mention, the lack of a main menu and an "end point" for the game (victory/defeat) means it still doesn't feel quite like a game yet...
Yup, there we go! The game now has a proper loop. This stuff, like most UI things, was fairly straightforward to implement, so I won't dig into it too much. But basically the end screen is a GameObject that stays "disabled" while a GameManager script listens for the "PlayerDefeated" event to fire, which happens when the player's party count hits 0 after a party member dies. Once that event fires, it turns on the "GameOver" screen, with the buttons hooked up to either load the menu scene or reload the game scene.
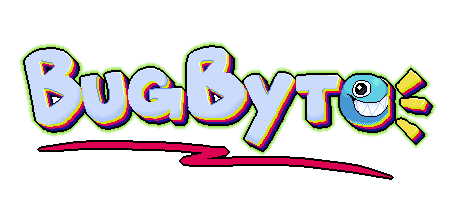
I also took the opportunity to draw the logo for the game! Overall I absolutely love how the logo turned out - I do think there are things that my classmates pointed out I could improve with it, but for a first pass I think I'm extremely satisfied.
Then there's the matter of the game and party UI. The party UI was actually fairly easy too, since the player maintains a list of their party members. All I have to do for party member UI is to make some layout containers to store the party member prefabs in, and have a script toss 'em in there for each Byte in the player's party. The frames will subscribe to all the necessary events that Bytes broadcast, such as "PlayerTookDamage", "PlayerUsedAttack", "PlayerEndedTurn", stuff like that. After some fiddling and some quick UI drawings, this is what the final party member frame looks like!
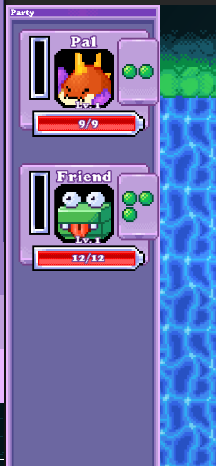
I did eventually want to have it so when you click on the buttons, a stats window would appear that would detail the Byte's stats like Strength, Defense, etc. But It's not as pressing as the other stuff, so again, I moved it to a wishlist item. I ended up pretty happy with how this turned out though :)
I did a similar thing with attacks, displaying their damage, cast time, cooldown, and cost! The actual frame gets greyed out based on how close the attack is to being off cooldown too, which I think adds a little more clarity to move cooldowns.
I went ahead and added a simple pause menu and inventory screen as well, since it was easy having now understood an okay way to handle screens and UI. I essentially just used the whole Event structure from earlier for these things, it made it incredibly simple, and since I was in my last few weeks that's what I went with.

Lastly, on the important UI front, I added the core roguelike mechanic to the game - random moves to add to your Bytes' movesets! Every 3 levels your Byte gets, a screen will pop up that will present the player 3 "random" moves, which they can add to their Byte's moveset. I put random in quotes because its actually just pulling from whatever Attack Pool (from a previous devlog) the Byte falls into. It pulls 3 random attacks from that Attack Pool, and lets the player add one. Funny enough, this does let you add two of the same move to your moveset. They do have their own independent cooldowns, though, so I thought it was kind of cool to keep!... For now.
There were only 2 big things left that I felt like I needed before I went into playtest mode, and those were the shop, and, by extension, multiple rooms.
The Last Two Tasks
I was really excited, to say the least - it's crazy to me to think that the end was quite literally in sight. After cutting down on scope, I felt I was making incredible progress and hitting all my deadlines! But at the same time, I was ready to take a break from working on this for now - I've been working on it and thinking about it pretty much non-stop over the past few months!
Multiple Rooms
Everything I really needed for this step was all there, I just kind of needed to assemble it together. I need to have transitions between rooms, doors closing, then doors opening once they're all defeated. Not to mention, for the AI pathfinding stuff, each room also needed to have its own pathfinding grid.
What I ended up doing was creating a RoomManager script - this script would keep track of which room the player was currently in, and keep track of things like the enemies in the room. Basically any information that other objects may or may not want to know about the room that the player is in. I once again used the singleton pattern here because it still made sense.
I hooked it up so that every time the player's and enemy's turn finishes, the room would update. By update, I mean it would update the list of current enemies in the room. Here's the code for what that roughly looks like:
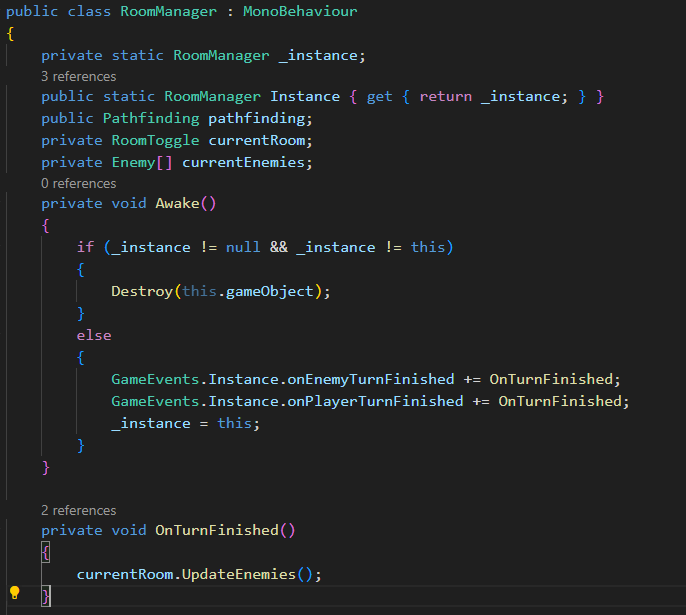
For each room, they have their own script that handles letting the RoomManager know that the player entered them. They have one great big BoxCollider2D on them, and when the player steps in it, it tells the RoomManager to update the current room and, if the current room's number of enemies is greater than 0, close the doors until the number of enemies is 0. Each room will also keep their own independent pathfinding grid, and when the RoomManager switches its focused room, it'll also absorb that room's pathfinding grid so enemies can access it no problem.
And that was all it took to get that working! I did have to make a GameObject for each hand-made room, which was tedious, but at this point I didn't have the time to design some incredibly robust code to setup multiple rooms on the fly... I'd have to settle with this for now.
I then went ahead and added a bunch more rooms with some varied terrain designs, enemy placements, and other things to add some length to a single playthrough of the demo.
The Shop
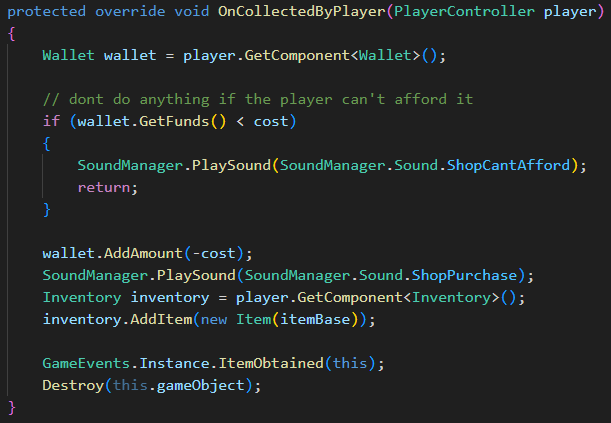
The Shop was surprisingly easy to implement at this point. Since the player already had an inventory (basically a list of item objects), all I had to do was:
- When the player steps onto an item, check if they have enough money
- If they do, add it to their inventory
- Delete the object from the world
I achieved this with some simple inheritance and a simple BoxCollider2D on each obtainable item. Then I just used some text to display their cost, and use that value in the player overlap event. I also threw in some last minute cheeky art assets for the shop.

It was bothering me, though, that there was nothing in the game that told players what the items did... So I added an "IToolTip" interface that lets items have a tooltip on mouse hover. Nifty!
I achieve the hovering stuff pretty easily - I just have prefab objects of the empty tooltips, HP bars, highlight cursor, etc, disabled while not hovering something. Then, when the player hovers something, I enable those GameObjects and set their values using whatever the mouse is hovering, then snap those objects into place relative to the cursor's position!
One Final Touch
I felt like I needed some sounds to really sell the punchiness of hits, and the dopamine of getting kills, levelling up, all that good stuff. I had found this app called Bfxr back in the day, which seemed like exactly what I needed. Luckily for me it was still available! It produces awesome chiptune sound effects with lots of useful presets and customization options, so if that suits your game's look and feel I highly recommend using it. Plus, you get to own the rights to any sounds you make with it!
Wrapping Up Development
I know the due date at the beginning said July 31st, but I'm writing this like early into August, so I didn't quite hit the goals at the time that I said necessarily, but I can happily say that I did finally add all the features I think make the game what it is at its core. So, I can comfortably say that outside of bugfixes and balancing adjustments, I am wrapping up development on this demo... For now! Plus, I really need to edit these devlog entries and get some gifs so I can start putting them up on itch.io, which I haven't had all that much time to do - oops!
This chapter was pretty dang long, I'm not gonna lie. I think this was the part of development that I crunched the most and when I felt the most adrenaline working on the game. Everything was really coming together and seeing the game slowly start to take form was a vicious cycle that made keep wanting to work more. Either way, I have to put a hard cap on it.
The next and final chapter will be on my playtesting findings and will be a sort of post-mortem on my experience with this project. If you've read this far, thank you so very much. I've had a ton of fun writing about and recounting my process of game-making, and if you've learned anything interesting or cool, or even if this inspired you to start working on something yourself, that's amazing. That's all I could ever hope for, really!
Until next time!
-Arda
Leave a comment
Log in with itch.io to leave a comment.